Remote Install With Intune
Applies to Windows Agents Only
You can use Microsoft Intune to deploy the Interguard Agent to devices to groups of devices enrolled in the Microsoft Intune Endpoint Manager. Follow these steps:
1. Prepare to install the Windows Agent with Microsoft Intune
Prepare to install the Interguard Agent to Windows based devices with Microsoft Intune by completing the following:
- Download the Interguard .exe agent installer.
In your Interguard app, go to Admin | Download Agents and request a Windows .exe "silent" installer download. - Access the Microsoft Intune Endpoint Manager Admin Console.
Make sure you can log in to and access the Endpoint Manager Admin console. You'll need permissions to create new app deployments.

- Set up a test group of devices for initial deployment.
The target devices must already be enrolled in the Intune MDM. Select Groups and New Group. Add test devices as members of the group. - Access a tool to convert the installer file.
The Microsoft Win32 Content Prep Tool converts the Interguard silent .exe installer into a Microsoft-compatible .intunewin file. - Set up antivirus exclusions.
Add exclusions to antivirus tools used in environment following instructions in the appropriate Antivirus Exclusion Guides. Antivirus may interfere with the successful installation of the Interguard Agent if exclusions are not properly applied. If you use Microsoft Defender for Endpoint, you can set up exclusions within the Endpoint Manager Admin console.
2. Create the installation file
- Create a new folder on your local machine.
We will use the directory to create the agent installer Intune App. For example:
C:\IntuneApp\Interguard\ - Copy the downloaded installer into the directory.
Copy or move the Interguard silent .exe agent installer to this new folder. Use the rename Windows function to carefully copy the installer name into Notepad.
IMPORTANT: Do NOT rename the Interguard installer file or it will corrupt the installation.
- Run the downloaded Microsoft Content Prep Tool.
Right-click on the downloaded Microsoft Win32 Content Prep Tool (IntuneWinAppUtil.exe) and select “Run as Administrator.” The utility opens a cmd window. - At the command prompt, enter the path to the Intune folder you created.
Use a closing slash, for example:
Please specify the source folder: C:\IntuneApp\Interguard\ - Enter or copy and paste the downloaded agent installer name.
From Notepad, copy and paste the filename for your downloaded agent installer.
Please specify the setup file: VisionInstaller.exe
IMPORTANT: Do not rename or shorten filename or the installation will fail!
- Specify an output folder.
The output folder can be the same as the source folder. For example:
Please specify the output folder: C:\IntuneApp\Interguard\ - At the last prompt, type N and press [ENTER]
Do you want to specify catalog folder (Y/N)? n - The tool processes your file and closes the cmd window.
The new file appears with the .intunewin file extension. If created in the same folder as the source file, you see:

3. Create the App in Endpoint Manager Admin Center
In the Microsoft Endpoint Manager Admin center:
- Select Apps > All apps
Press + Add to create a new app.
- Type: Windows App (Win32)
- Select app package files: Navigate to and select the .intunewin file you created above.
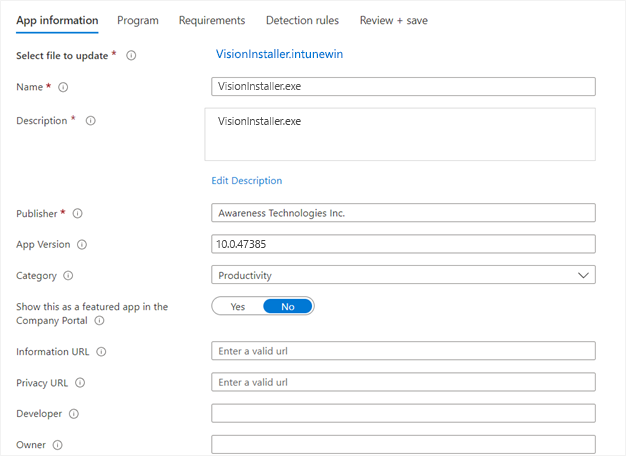
- Under the App information tab:
Fill in the required fields as you wish. Because the Agent Installer app is designed to run silently, you can customize these values as you see fit.
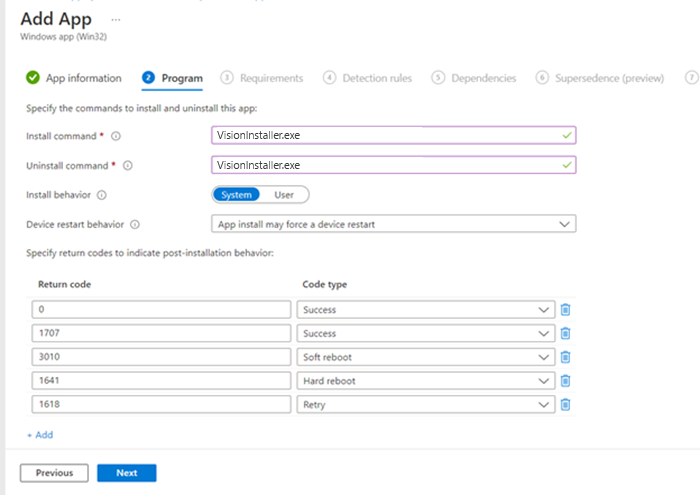
- Under the Program tab:
- Install command: The full filename of the .exe with no additional switches to run silently.
- Uninstall command: Leave this the same as install (our installers do not support uninstall so a deployed uninstaller will require a separate file, and this is a required field).
- Install behavior: Select System and leave all other values as default. Our installer does not force reboot the machine.
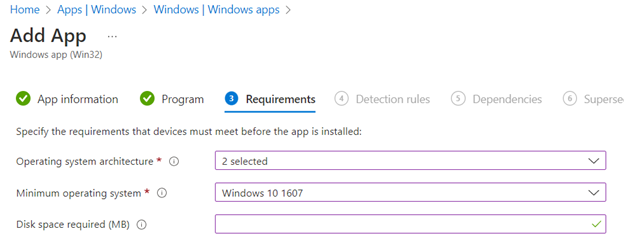
- Under the Requirements tab:
- Operating system architecture: Check the box for both 32- and 64-bit options
- Minimum operating system: Select the oldest available option in the dropdown (Windows 10 1607), leave all other values blank, and proceed to the next tab.
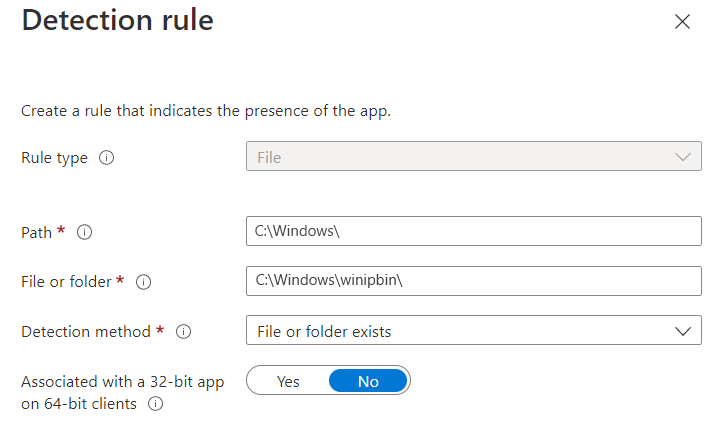
- Under the Detection rules tab:
Manually configure detection rules as follows:
- Rule Type: File
- Path: C:\Windows\
- File or folder: C:\Windows\winipbin
- Detection Method: Select “File or folder exists.”
- Associated with a 32-bit app on 64-bit clients: Select No.
- Leave the Dependencies and Supersedence tab sections blank.
- Save the new application.
The specified app file is uploaded to the Endpoint Manager Admin Center.
4. Deploy the agent installer
- Select a group for deployment.
Under the Assignments tab in the Required section select the Group to receive the agent. Groups should already have been created prior to install. We highly recommend a test group for the initial deployment. - Select settings for deployment.
We recommend the following settings however this is fully customizable and is a matter of preference:
- End user notifications - Hide all toast notifications
- Delivery optimization priority - Content download in background
- App availability and installation deadline -As soon as possible
- You are notified of successful deployment.
App deployments are typically completed via Intune in approximately 15-60 minutes in our testing if the machine is powered on and connected to internet. A successful install status should appear in the Intune console and the device should appear in the Interguard console as well.
Updated: 03/25/2024