Active Directory
Interguard provides a basic method for importing and integrating groups and users from Active Directory. Export from your Active Directory and import them into Interguard. Repeat the process as needed to update the groups you have already imported.

About Interguard groupsAbout Interguard groups
Due to limitations in our user management, you may have to make changes to your Active Directory to use this integration. In Interguard:
- A user can belong to only one Group.
Your Active Directory may have a user assigned to more than one group. Interguard will import the user to one group only. See Preparing for import below to learn how to get around this. - Each user assigned to an Interguard Group receives that Group's policy and licensing.
You need to explicitly assign a policy to each group. The policy applies to and licenses all users in the group. If necessary, for example - for an investigation, you can override the group's policy and assign a user one with different recording settings, and perhaps a different license level. - The Unassigned group cannot be assigned a policy.
Users in Unassigned who are not assigned a specific "override" policy will NOT be recorded.
Preparing for importPreparing for import
If users belong to multiple groups in your Active Directory, set up "mirror" groups. These will be your "Interguard" groups.
- Choose a group name prefix for your Interguard groups.
For example, you might choose rcd- to indicate a "recorded" group. - Set up mirror groups in your Active Directory using the prefix.
Although Interguard does not use nested groups, you can maintain a group structure using mirror group names.
For example, suppose you map a group named Chicago to rcd-Chicago. Your Chicago group contains a QA group with 10 users and a Sales group with 5 users. The export results in a group named rcd-Chicago. When you run the import, an Interguard group named rcd-Chicago will contain the 15 users from both nested groups.
If you instead map a group named rcd-Chicago_QA to the nested QA group and a group named rcd-Chicago_Sales to the nested Sales group, you end up with two groups in Interguard, rec-Chicago_QA with 10 users and rcd-Chicago_Sales with 5. It doesn't matter what the "recorded" group name is, as long as you can track who is in which group.
- In Active Directory, assign the appropriate users to the new, prefixed groups.
Any user you do NOT assign to the mirror group will not be part of the group imported into Interguard. A user in more than one mirror group will end up being imported into one group only (see below).
Things to know:
- If an import finds the same user in multiple groups:
The import adds or updates the user in the first group in the import sequence. The import removes the user from subsequent groups in the import sequence. - If an import shows a user in a new group, the user is removed from the old group.
For example, Bob was oringally added in the Finance group. A subsequent import has Bob added to the QA group. Bob will be removed from finance and added to QA. The user license may change based on the Group policy assignment. - You can still set up non-Active Directory groups.
It's OK to set up Interguard groups in your console app that are NOT related to Active Directory, but keep in mind, a user can only belong to one group. If you want the users synced to AD, you should plan on using only your imported AD groups.
Running the importRunning the import
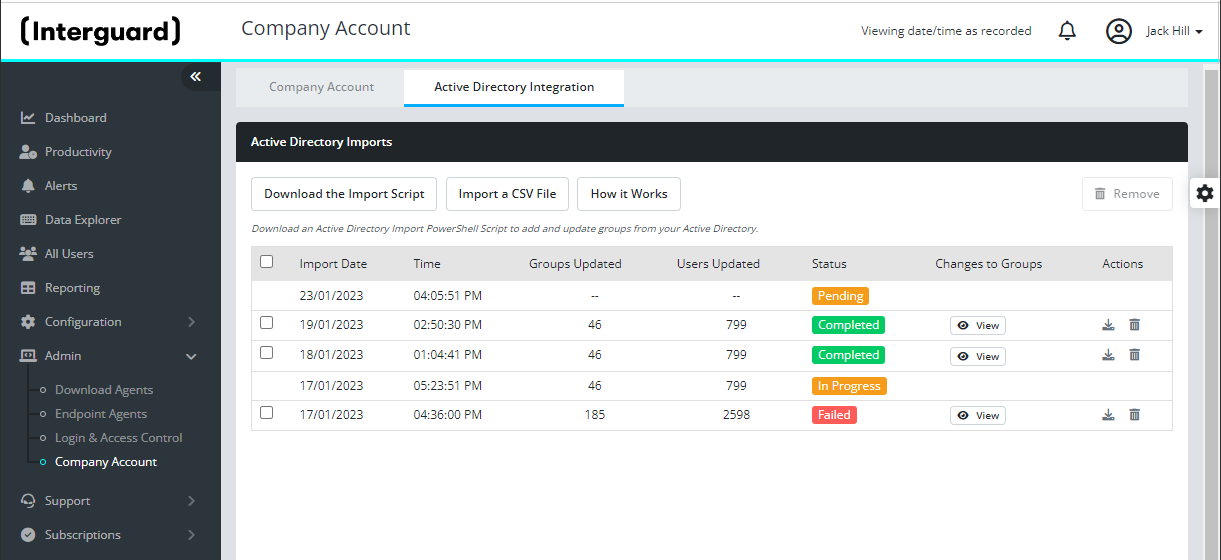
When your mirror groups are ready, login to the Interguard console and go to Admin | Company Account | Active Directory Integration.

- Download the Import Script.
A Download button is provided on the Active Directory Integration page. The downloaded file is named AD_Export-[version].ps1. The file version will be updated periodically, but the basic procedure won't change. - Run PowerShell "as Administrator"
On a computer with the Active Directory PowerShell cmdlets, such as a domain controller, and from the directory where the downloaded script is located, run PowerShell "as Administrator." At the command prompt, enter:
.\AD_Export.ps1 -GroupPrefix rcd-
The -GroupPrefix value finds all groups matching rcd-* in your Active Directory. If you omit -GroupPrefix, the export will include ALL Active Directory groups.
If PowerShell fails to run the script due to the Execution Policy, you can temporarily bypass the Execution Policy by running the following command at the same administrative PowerShell prompt: powershell.exe -ExecutionPolicy Bypass -File .\AD_Export.ps1 -GroupPrefix rcd-
- The script runs and outputs two files:
- AD.csv
Contains the exported information. You will upload this file in the Interguard console. Although you can open the file and review its contents, please do not change the contents of the file, or the import may fail. - Veriato_Vision_AD_Export_Log
Contains log information for the script execution (not needed for the import). If anything isn’t working correctly, this file may be useful to Technical Support. You can open the file and review its contents.
- Import the CSV file.
Return to Active Directory Integration in the Interguard console. Press the Import a CSV File button to import the changes.
If an import has Failed, press View to see changes that were NOT applied. Try again, or contact Support.
Updating imported groupsUpdating imported groups
Periodically update your Interguard groups by downloading and re-running the script. If a user's Active Directory status or group membership changes, a new import takes care of this. Follow the steps above:
- Press View to review the changes.
- Changes are reflected in Configuration | Groups & Policies.
Viewing changesViewing changes
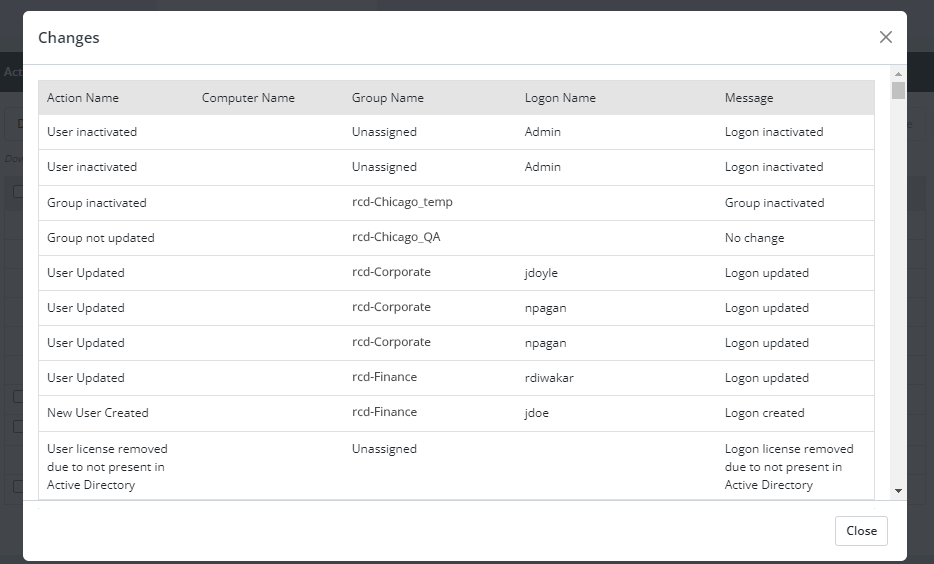
Press the View button in an import row to review changes made by that import.

Possible "Actions" and "Messages" are:
- New User Created
[Logon Name] was created and will appear in [Group name]. - User Updated
[Logon Name] user attributes were updated. - New Group Created
[group name] was created. - User's Group Updated
[Logon Name] was moved to [Group Name]. - Group Updated
This group name has been modified. - User Inactivated
[Logon Name] is no longer present or enabled and was removed. - Group Not Updated
No change to [Group Name]. - Group Inactivated
[Group Name] is deactivated or disabled and has been removed. Find remaining users in Unassigned. - Group deletion removed user license due to no policy override
[Group Name] was removed. Unlicensed [Logon Name] was moved to Unassigned. - Group deletion did not remove the license due to policy override
[Group Name] was removed. Find licensed [Logon Name] in an updated group or in Unassigned. - User's license not removed due to policy override and no policy attached to group.
[Group Name] appears to have no assigned policy. Licensed [Logon Name] was moved to Unassigned. - User Update Failed
[Logon Name] had updates that could not be resolved. - User belongs to multiple groups
A user can belong to only one group. [Logon Name] was not added to [Group Name]. Look for the user in a group listed earlier in this import.
Remove unneeded import entriesRemove unneeded import entries
Remove import entries you no longer need by selecting them and pressing Remove or by clicking the trash icon at the end of the row.
Updated: 07/25/2024